A Gardener’s Design Tips

As a gardener I believe in creativity and a personal style. I am not a fan of any boundaries. Garden design is an art form and should express the talent of the gardener or creator. But there are always the natural restrains and plants have different requirements. So knowledge and experience are valuable and necessary to succeed at least in a long-term. To arrange a garden bed is much like being a composer writing a symphony. There are some things to take into account when arranging a garden bed. In this post I share my design tips.

A Gardener's Design Tips | My Green Nook

Basic research

First of all we got to get some perspective. Do some basic research to find out what you are dealing with. The choice of plants will be the next step after you sorted out the following questions below:

  • The surroundings – look around what kind of houses or buildings and other gardens is present in the area, does the garden have a history, characteristic of the period the house and garden was built, nature which native plants grow here
  • The location – what preconditions do you have taken garden zone, microclimate, soil, sun/shade into account
  • The purpose – for what are you going to use the area, what is next to the garden bed, is it a place for the kids to play, a relax or a social area (like a dinner place), edible (food production), entrance/passing by
  • The flow – are there other constructions, natural lines or a beautiful view to take into consideration. From where will you see the garden bed
  • Maintenance level – how much work/how much time do you want to spend
  • Seasonal value – when will you use the garden, which time of the year will you see the garden bed most. For example a home garden, a summer-house and a school have different seasonal needs regarding bloom, fruit and winter decoration.

Choice of plants

As you may have noticed there are some descriptions of the plants that repeat in my gardening posts. Like solitaire, ground-cover and so on. This is one way to divide plants in which is very useful when you are about to arrange a flower bed. These characteristics tell use something about how the plants grow and is vital to the composition. You may use all or pick a few depending on the purpose and look you strive for. I will describe the most common characters and list some examples to give you a picture.

Choice of plants. Garden Design | My Green Nook

Weaver, Group builder, Ground-Covering, Pop-up. Photo Credits in the end of the post.

Solitaires: Are plants with a striking feature often tall and architectural. They draw the attention and speak with capitals. These are standing by themself or in smaller groups, often of three plants.
Yucca filamentosa – Adam´s needle
Some species of Miscanthus sinensis – ornamental grass
Topairy shaped plants or bonsai

Weavers: Are airy, delicate, cloud-like plants which gently weaves themself in among other plants. Holding together and softening the structure of the arrangement.
Thalictrum delavayi – Chinese meadow rue
Knautia macedonica – Macedonian scabious
Gaura lindheimeri – Indian feather

Group builders/colonizers: Are often growing in rosettes or bouquet-like shapes creating a group of flowers. Some may slowly spread by creating new groups and become colonizers. These often make the base/mass of the arrangement.
Echinacea purpurea – purple coneflower
Hemerocallis – day-lilies
Lavandula angustifolia – lavender

Ground-covering: Rugs or matt-like spreading plants preferably quite dense. Most are low, some are evergreen with no showy flowers which can have its advantages. These makes the boarders smoother and hold the arrangement together like a rug creating an island under the furniture.
Vinca minor – dwarf periwinkle
Asarum europaeum – European wild ginger
Galium odoratum – sweet-scented bedstraw
Some species of Geranium – cranesbill
Most species of Thymus (for example Thymus serpyllum) – thyme

Pop-up plants: Often biennial or plants moderately spread by seed. These are popping up here and there making the arrangement dynamic and shifting over time.
Verbascum thapsus – great mullein
Angelica gigas – purple parsnip

This is one way to start working on a plan for a garden bed. Next time you look for plants in literature, at a nursery or garden center keep this in mind. See if you can find plants from each group.

Which tools and guidelines do you use when designing your garden or arranging a flower bed?

This post was previously published in two parts during the A-Z Challenge read the originals in K as in Kolkwitzia and Y as in Yucca. Curious about more plants? Check out the challenge by clicking the link above.

Happy Gardening!

Floral Border


© The photos are licensed by Creative Commons and some rights are reserved. License Attribution 2.0. Photo credits as follows:

Knautia macedonicaStefano
Echinacea purpurea – free
Thymus serpyllumKingsbrae Garden
Angelica gigasChris Kreussling

Shared at:

Thursday Favorite Things Blog Hop

X as in Xerophyllum

X as un Xerophyllum. Blogging from A to Z April (2015) Challenge | My Green Nook Family: Melanthiaceae

Genus: Xerophyllum

Species: Xerophyllum tenax

Common names: bear grass, squaw grass, soap grass, quip-quip, Indian basket grass  Swedish name: björnlilja

Xerophyllum is a genus of perennial plants native to North America. There are two species, X. asphodeloides and X. tenax, both are monocots and closely related to lilies.

Xerophyllum asphodeloides (common names: turkey beard, eastern turkey beard, beartongue, grass-leaved helonias, mountain asphodel). This species grows in the sandy soils of New Jersey pine barrens habitat, as well as oak-pine woods in the Appalachian Mountains. It is threatened by the loss and fragmentation of its habitat and fire suppression. It is considered a popular garden plant, producing spikes of white flowers.

Xerophyllum tenax is an important part of the fire ecology of regions where it is native. It has rhizomes which survive fire that clears the ground. The plant thrives with periodic burns and is often the first plant to sprout re-colonizing burnt out areas.
The elongated leaves were used for basket weaving by the Native Americans. Its fibrous leaves, which turn from green to white as they dry, are tough, durable, and easily dyed and manipulated into tight waterproof weaves. They also braid dried leaves and adorn them on traditional buckskin dresses and jewelry. Today the bear grass are harvested for commercially use in flower arrangements (both fresh and dried) or sold in craft stores for use in arts and crafts as well as home decoration.

I have chosen to describe the bear grass because it is the one I have found out being grown in Sweden. But the description and plant care is mostly the same for both species.

Bear grass. X as in Xerophyllum. Blogging from A to Z April (2015) Challenge | My Green Nook

Xerophyllum tenax – bear grass

Description: Xerophyllum tenax is a hardy long-lived solitaire plant with spiky pine needle-like or thread-like herbaceous leaves. It blooms in the early summer carrying small stellar flowers of white at the tip of the stalk like an upright club. The flowers are slightly fragrant. Plant colonies typically only bloom every five to seven years. It grows in a tuft and creates colonies by the spreading rhizomes.

How to grow: Xerophyllum tenax prefers full sunlight and well-drained but moist, rich soil. It can tolerate wet soils. It is important to supply mulch in spring to keep the moist in the ground. Regular watering is needed. Once established do not move. Propagation by seed or dividing in the spring in cooler areas or the autumn in warmer areas. 

Native arts and crafts

Almost every country, indigenous culture, and native folks have their significant crafts. Some skills have been lost over time but some still thrives. It is amazing what we can do with natural materials and the art that can be preformed. Garden/nature crafts belong to gardening and a greener living. If we do it with care and respect. At the ethnographic museum I can stand and study the arts and crafts of long gone people. Mesmerized by the beauty made by hand and few but abundant resources. Have you ever tried basket weaving?

Woven basket. X as in Xerophyllum. Blogging from A to Z April (2015) Challenge | My Green Nook

Let your creativity loose. Gather old scraps or whatever you got at home and make a basket. Here follows some tutorials for inspiration.

Tutorials

J as in Juniperus

Blogging from A to Z April (2015) Challenge | My Green Nook Family: Cupressaceae

Genus: Juniperus

Species: Juniperus communis

Common names: common juniper  Swedish name: en


The genus Juniperus consists of about 60 species widely distributed from the Arctic to the Central America. They are evergreen conifers with needle-like and/or scale-like leaves. The female seed cones are very distinctive, with a berry-like structure. Juniper berries are often aromatic and can be used as a spice in a wide variety of culinary dishes. It enhance meat with a strong flavour, such as game and is best known for the primary flavoring in gin.

Many varieties of Juniperus are used in landscaping and horticulture, Being one of the most popular species for use in bonsai. It is also a symbol of longevity, strength, athleticism, and fertility. Juniper is one of the plants used in religious rites. The ripened berries is known for treating conditions such as asthma and sciatica, as well as to speed childbirth. Juniper berries are steam distilled to produce an essential oil.

Juniperus communis is dioecious, with male and female cones on separate plants, which are wind-pollinated. In Scandinavia juniper wood is used in crafting, for example making wooden butter knives. It was also frequently used for trenails in wooden shipbuilding due to its tough properties.

J as in Juniperus. Blogging from A to Z April (2015) Challenge | My Green Nook

Juniperus sp.

Description: Juniperus communis is very variable in its form. From a cone-shaped tall shrub to a low spreading shrub, and occasionally even a tree reaching 15 m. Juniperus communis is cultivated and used as an evergreen ornamental shrub in gardens. Therefore having a horticultural value. Attracts birds.

How to grow: Juniperus communis thrives in full sun and well-drained soils. Most varieties are drought-tolerant once established. Junipers are tolerant of a wide variety of sites and have many uses, including in the rock garden and as groundcover. It can be used in containers. Requiring low maintenance and little if any pruning. Propagation by cuttings.

Bonsai
The thousand-year old art of living miniature plants. Bonsai means BON = bowl and SAI = plant and is derived from China, but mostly developed in Japan. A bonsai requires high maintenance, but is so beautiful and sculptural.

J as in Juniperus. Blogging from A to Z April (2015) Challenge | My Green Nook

B as in Buddleja

B as in Buddleja. Blogging from A to Z April (2015) Challenge | My Green Nook Family: Scrophulariaceae

Genus: Buddleja (or Buddleia)

Spieces: Buddleja davidii

Common name: butterfly bush, summer lilac, orange eye Swedish name: fjärilsbuske, syrenbuddleja

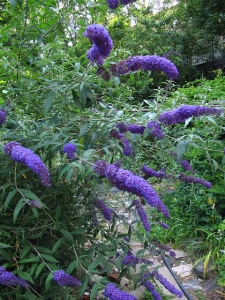
The Buddleja genus includes about hundred species of flowering plants endemic to Asia, Africa, and  America. The flowers are generally rich in nectar and often strongly honey-scented. Therefor attracting butterflies, bees and moths. Buddleja davidii is one of the most used cultivates in gardens it descends from central China. It is a great coloniser of dry open ground since it self-sows. Buddleja davidii may become invasive in some regions of USA and UK. It is banned in certain areas and other species are recommended to use. There are also some cultivars with sterile seeds to choose from. Due to its  likeness to spread it also inhabited urban bomb sites in the aftermath of World War II. This gave it the less flattering nickname ‘the bombsite plant’.

B as in Buddleja. Blogging from A to Z April (2015) Challenge | My Green Nook

Buddleja davidii. Photo: Kristine Paulus ©


Description: Buddleja davidii is a vigorous shrub with an arching habit. It is frost sensitive and often the old plant parts (last year´s growth) are killed during the winter in temperate areas like Sweden. This is not a problem if the roots survive since it is fast growing and younger wood is more floriferous. There is a wide range of varieties where ‘Black Night’, ‘Nahno Blue’ (small variety), ‘White Profusion’ are some of the more common.

How to grow: Buddleja davidii prefers warm, nutritious soil rich in compost or mould with good drainage. Dry or heavy soils does not suit it. Place it in a sunny and protected spot in the garden. To encourage new growth the shrub is usually hard-pruned in spring once frosts have finished. To avoid spreading of seeds and prolong the blossom over-bloomed flower panicles are pruned. In areas with cold frosty winters you should cover the basal parts with soil, leaves or hay to protect the roots.

Crafting tips: If you love butterflies Buddlejas are one of those plants you have to get. To help the butterflies even more there are some crafts you can do to invite them.


© The photo is licensed by Creative Commons and some rights are reserved. License Attribution 2.0

Craft Challenge – Cereal Box

2 Crochet Hooks


Every month there is a new craft challenge starting. You are supposed to recycle – upcycle – repurpose various of things. In February the theme is cereal boxes and how you can transform them with your creativity. I love to reuse and redesign old stuff and scraps. The whole idea of an environmental craft challenge really set my head in a spin. There are so much you can do and I recommend you to check out all the cool things the participating crafters have done.

I went in for a total recycled craft so I only got to use scraps. I gathered some old food magazines, one cereal box, one macaroni box and a wire from a bread bag. I used some glue, scissors, a knife and my hands. I decided to make a recipe box where I could collect all my recipes that today are scattered in a kitchen cabinet. I let my creativity loose on this:

Craft challenge - Cereal Box | My Green Nook

I started with cutting the cereal box opened to get a lid. After tearing out food images from the magazines I glued them on the cereal box. I wanted to make it a little rough so I didn´t use the scissors to cut the images. I rather tore them to fit in the collage. Along the edges I folded the images into the box to make a smooth lining. To make the box more steady I cut pieces of the macaroni box for support and to cover the edges of the images. Glueing the box pieces on the inside. Of the macaroni box I also made a lock. From the inside of the box I stuck through the bread wire. The two ends went into the lock and by twisting the wire the lid was secured. Which makes it possible to keep the box standing. Now my new upcycled recipe box can join the cook books on the shelf.


Craft Challenge - Cereal Box | My Green Nook

Life With Garnish

Redesign old sheets for your baby

Making baby sheets of worn out sheets

I guess you like me have some old sheets stuffed away in a closet. We usually use them for cleaning by tearing cloths of them. But I got an idea how to reuse and recycle this poor fabric. The top and the bottom of the sheets often are of good quality it is the middle part that gets spent. So why not redesign it?

I started with cutting of the worn down pieces and used the fresh ones to sew a baby sheet. And while sewing I got a little crazy and tried to make some kind of decoration to make it a bit cuter. With a little imagination maybe you can see that it is frogs and water lilies. My idea was to have the sheet under a blanket and fold the decoration around the top. Used sheets are very soft and all eventual chemicals have been washed out. So it is actually perfect to recycle them for your baby. And you can redesign them however you like. I just took what I got at home and gave it a try.

Redesign old sheets for your baby - My Green Nook

Success isn´t to be the best it is to have tried and done your best. That is my motto so I am pleased with my effort even though I would do it differently next time. At least I know our baby will sleep safely under this soft environmental friendly sheet.


Creative K Kids


How to sew an easy baby hat

Baby beanie tutorial - My Green Nook

Today I started and finished the mission of sewing a baby hat or beanie. I found an easy free pattern and made a tutorial for you. You may use the size measures of baby hats from any baby clothes store online if you want to make it larger. This is made for a newborn with a head circumference of about 34cm (13,5” around the head). Seam allowance about 1cm (1/2”). I used some of the jersey fabric I got left over when sewing the baby rompers. This is a perfect time to reuse fabrics and old clothes. You may for example use an old t-shirt and cut the hat from it.

Let´s begin:

You need two pieces – so fold your fabric right to right side. Take your pattern and needle it to the fabric. Then cut out the pieces. My pattern had a bottom width of 18cm (7”) and a center hight of 26cm (10”).

Baby hat pattern - My Green Nook

You now have the two pieces which will become the hat. Taaadaa!

Baby hat pieces - My Green Nook

Needle the pieces together right to right side. And prepare to start sewing. I choose to sew a light zig-zag length 3 and width 1,5 on my machine. Don´t forget to leave the bottom open.

Sewing baby hat - My Green Nook

Iron all seams and fold the bottom wrong to wrong side. I made the fold about 6cm (2,5”) you may adjust it to suit the pattern of your fabric.

Sewing baby hat - My Green Nook

Sew around the top of fold. Creating a neat bottom. I put a bit of tape on the machine to get a guidance mark so I would be sewing straight.

Sewing baby hat - My Green Nook

Turn the hat right side out and fold from the inside about 3cm (1,2”). The seam you made in the previous step should not be seen but you got some room for adjustments of the folds hight.

Sewing baby hat - My Green Nook

Attach the fold by sewing (or stitching by hand) in the seam at both the sides. To make an invisible seam.

Sewing baby hat - My Green Nook

Now your baby hat is finished. Easy, right?!

Finished baby hat - My Green Nook

Now that I am in the mood of creating stuff for my baby I have found a great use of Pinterest. This pattern and tutorial is inspired by Spoonflower and the credit is therefore not all mine. Though I made some adjustments. What have you created lately? Feel free to leave a comment – I like to be inspired.


Shared at:
Thursday Favorite Things Blog Hop

2 Crochet Hooks

I made it – love conquers all

Love conquers all - My Green Nook

Today is a great day. Today I am victorious. Today I am proud of myself. I made it – really made it all by myself. I tried something new and manage to complete the task.

I have not been sewing much since I went to secondary school (Swedish högstadiet). We had an awful teacher and that did not give justice to the craft. Everything became boring sewing, stitching, crochets, knitting. It was horrible and I never managed to create anything of true value, at least not in my own eyes. From time to time I have made an effort to try to craft but failed. Bad memories haunting me. I have not had patience nor the joy for the art. With the news that I was going to become a mother something happened. I changed somehow and keep on surprising myself.

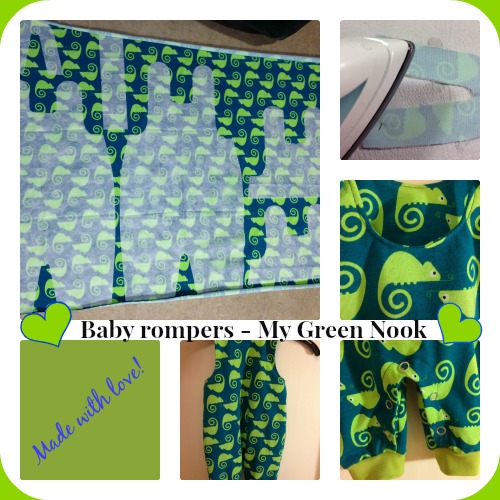
With my future motherhood the wish to be more handy and crafty has grown proportionally. It started with cooking – my baby needs real homemade nutritious food with a lot of vegetables and fruit on the menu. Then I made the necklace I published in an earlier post, How to make a baby nursing necklace. And now I have sewed my first baby rompers – amazing! And guess what?! I had fun and want to create more. It may not be the perfect rompers and I know there are others who would do a better job. But I am happy and it is a start which may lead anywhere. I think my love for our baby made me conquer this obstacles. The rompers are definitely made with love.

Baby rompers -My Green Nook

As you may have observed the pattern is laid on the wrong side of the fabric. Do not worry – I did not cut the fabric as seen in the photo. I just wanted to get a picture of how it would look. The pattern is from Stoff och Stil baby/newborn rompers (sparkdräkt) nr 80001.

How to make a baby nursing necklace

Baby nursing necklace with wool and wooden beads

Baby nursing necklace with wool and wooden beads

As some of you already know I am going to become a mother in May. My creativity has taken a leap and I feel inspired by the new life ahead. There is so many things I want to prepare before our baby arrives. I have a couple of craft ideas and one of those I would like to share with you here.

Baby nursing necklace with wool and wooden pearls

This is what I used – carded wool, wooden beads (the large one is actually a seed), waxed cotton thread, a lock and a sharp needle. You find all the items at any hobby/craft store.

Required materials

Required materials

First it is time to tousle the wool into round beads. Use a bowl and mix water and soap in it. The water should feel soapy when rubbing your fingertips in it. The temperature should be about 40-50 degrees Celsius or at least finger warm.  Tear of some of the wool (never cut) and soak it in the soap water. Squeeze out the excess water and start rolling the wool gently between your hands. Like you would roll a meatball. After a while dip the wool in the soap water again and continue rolling. Repeat until you got a firm wool bead. Now it is time to wash the bead in water to get rid of the soap. Let the wool bead dry and begin with a new one.

Wool bead

Wool bead

When the wool beads have dried it is time to make the necklace. Use the sharp needle and thread it with the waxed cotton thread. Stick it through the wool beads and start creating your own necklace.

I made my necklace adjustable to meet my and my baby´s needs. Use which colors and beads you like. But choose safe materials that doesn´t break, is easy for the baby to pull off or may injure the child in any way. The necklace is nice for the baby to play with and touch during nursing and feeding. It stimulates the tactile senses and is a fun way to promote the baby´s growth.

Finished necklace

A necklace to the joy of both mother and baby

A necklace to the joy of both mother and baby

Finished necklace

2 Crochet Hooks
Creative K Kids

Livets cirkel

Trädets rötter söker sig ut
i jordens gömda rum
Förankrar sig
Stadigt står det genom stormar
och bistra tider
Kronan sträcker sig mot himlen
Grenarna vajar fritt i vinden
Bladen söker solens ljus
skiftar färg efter årstiderna
I dess skydd bygger djur sina reden
Under dess bark vävs hemliga gångar
Trädet myllrar av liv
Skänker oss vårt andetag
Livet tar inte slut då det faller av ålderdom
I dess forna skugga gror nytt liv
I det nya ljuset spirar blommor
I dess förruttnande stam
flyttar nya arter in

Livet går vidare
Cirkeln sluts
~ Charlotte Andersson, 2014

©2014 Charlotte Andersson, Min Gröna Vrå. Fotografierna och dikten är mina verk. Vill du dela omnämn mig som författare/fotograf.